Tuesday, March 30, 2010

Monday, February 8, 2010
LAB 4-POSTER-
LANGKAH-LANGKAH...
STEP 1
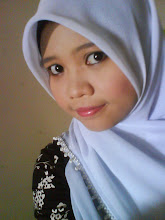
Mula-mula bukak new document bersaiz 1000*600px…download picture muka orang…kemudian cut menggunakan magnatic lasso tool…dan copy paste pada document…
Kemudian centrekan gmbar menggunakan ctrl+t..
Step2
Gunakan blur tool untuk soften kan lip…
Step 3
Go to Filter -> Liquefy. It is suggested to set the brush pressure at not more that 50%. Only 2 tools need to be used here – primarily, Forward warp tool and at certain places, Bloat tool. So, let us begin. Take Forward warp tool and with easy strokes from nose, middle pull to both sides
Step4
take Bloat tool and make the eyes of the girl a little bigger than its usual size.
Step 5
take Burn tool and darken the nose from both sides and use Dodge to lighten the nose from the middle.
Step 6
Now add Adjustment layer (Curves), to define the face couture of the girl.
we will transform human skin into Navi and add one more Adjustment layer. This time it would be Hue/Saturation.
While holding the Ctrl button, click on layer with girl’s couture and make active Crocodile skin layer. Go to Select -> Invert and click delete bottom. Change blending mode to Overlay and set Opacity to 50%.
After this, while holding Ctrl, click on layer with ornament and you will have an ornament selection. Delete ornament. Fill your selection with dark blue colour: #384c9c and go to Filter -> Blur -> Gaussian blur and select about 10-15px. Add your ornament to some part of girl’s face. Now repeat this step 4-8 times
Step 7
Now, we will add glowing sparkles. For that, we will again create a new layer. From brushes pallet, select stars brushes and in Brush tip shape, select spacing about 50%:
Take pen tool and create a line below the eyes of the girl and go to Paths, right click and select Stroke Path, select Brush and click ok. Do not forget to set white colour and brush Hardness to 0.
Step 8
think most suitable background is Jungle or war episodes. You can take whatever you like. I Googled for a nice war episode and took a screenshot from Avatar itself and added it.
Go to Image -> Adjustments -> Hue/Saturation
Create another new layer, fill it with black colour and go to Filter -> Render -> Lens Flare. Select 35mm Prime and 120%. Click ok and change blending mode to screen.
Step 9
Create a new layer and write your text with grey color: #e1dddd.
To this text, add layer style Outer glow
Add fire bloom cut and paste into layer then changes the blending option..change blend mode to overlay.
Finally add some picture cut use elliptical marquee tool then copy and paste then change the blending option.
HASILNYA...


STEP 1
Mula-mula bukak new document bersaiz 1000*600px…download picture muka orang…kemudian cut menggunakan magnatic lasso tool…dan copy paste pada document…
Kemudian centrekan gmbar menggunakan ctrl+t..
Step2
Gunakan blur tool untuk soften kan lip…
Step 3
Go to Filter -> Liquefy. It is suggested to set the brush pressure at not more that 50%. Only 2 tools need to be used here – primarily, Forward warp tool and at certain places, Bloat tool. So, let us begin. Take Forward warp tool and with easy strokes from nose, middle pull to both sides
Step4
take Bloat tool and make the eyes of the girl a little bigger than its usual size.
Step 5
take Burn tool and darken the nose from both sides and use Dodge to lighten the nose from the middle.
Step 6
Now add Adjustment layer (Curves), to define the face couture of the girl.
we will transform human skin into Navi and add one more Adjustment layer. This time it would be Hue/Saturation.
While holding the Ctrl button, click on layer with girl’s couture and make active Crocodile skin layer. Go to Select -> Invert and click delete bottom. Change blending mode to Overlay and set Opacity to 50%.
After this, while holding Ctrl, click on layer with ornament and you will have an ornament selection. Delete ornament. Fill your selection with dark blue colour: #384c9c and go to Filter -> Blur -> Gaussian blur and select about 10-15px. Add your ornament to some part of girl’s face. Now repeat this step 4-8 times
Step 7
Now, we will add glowing sparkles. For that, we will again create a new layer. From brushes pallet, select stars brushes and in Brush tip shape, select spacing about 50%:
Take pen tool and create a line below the eyes of the girl and go to Paths, right click and select Stroke Path, select Brush and click ok. Do not forget to set white colour and brush Hardness to 0.
Step 8
think most suitable background is Jungle or war episodes. You can take whatever you like. I Googled for a nice war episode and took a screenshot from Avatar itself and added it.
Go to Image -> Adjustments -> Hue/Saturation
Create another new layer, fill it with black colour and go to Filter -> Render -> Lens Flare. Select 35mm Prime and 120%. Click ok and change blending mode to screen.
Step 9
Create a new layer and write your text with grey color: #e1dddd.
To this text, add layer style Outer glow
Add fire bloom cut and paste into layer then changes the blending option..change blend mode to overlay.
Finally add some picture cut use elliptical marquee tool then copy and paste then change the blending option.
HASILNYA...


gambar - gambar yang diperlukan...
Saturday, January 30, 2010
NUR AMIRAH HAZIQAH BINTI TAMAM-AI090141-LAB 3-

assalamualaikum..hye..ni hasil kerja saya tok lab 3.....may be ok may be tak.....pe pun comment ok.....thanks.......
NUR AMIRAH HAZIQAH BINTI TAMAM-AI090141-LAB 2-

hasil adobe fotoshop saya..maafla..kalaux tak cantik...nama pun masih belajar...gambar tu lebih kurang macam patung krismas la..huhuhu... sebab nak kata macam chef macam tak huhuhu...dan untuk classmate law nak comment dipersilakan tapi jagan sampai ada yang terkecil hati.....
Subscribe to:
Posts (Atom)